All You Need to Know to Create a Course Outline

A course outline is a short, concise document illustrating, at a glance, the general concept and design behind a training course or program.
Short. Concise. At-a-glance. As these words indicate, this is not a fully fleshed-out agenda, with detailed instructions for activities and timings calculated to the minute.
The purpose of a course outline is to quickly communicate to your team and client what the course will be about. It should be essential, lean, and self-explanatory.
If done well, course outlines can also serve as canvases upon which to build future, more detailed work directly, saving you the hassle of re-organizing information. You might also hear a course outline referred to as a high-level plan, or a concept note (although I’d argue that a concept note is a part of a course outline, but let’s not get too bogged down by semantics).
In this article, I’ve summarized the course creation process, including all you need to know to be equipped to create top-notch course outlines. I’ve also included a description of the 5 frameworks I most often use in my own practice. These are narrative archs and storylines I use to create course outlines that are both easy to understand and exciting to embark upon.
Here is what we will look at:
What is a course outline?
Having read the definition above, you may find yourself wondering: isn’t that a course syllabus? In fact, a training course outline and a syllabus may contain more or less the same information, but with a different focus.
A course outline is an internal, working document. It exists to help learning designers, trainers and their team coordinate work and communicate with clients commissioning a training course or program.
As this is an internal document, it may contain shorthand, abbreviations, and elements color-coded in a way that peers and professionals will understand, but might puzzle participants.
On the other hand, a syllabus is a description of a course intended to be read by participants and prospective participants, and to guide student learning. Just like a course outline, a syllabus will contain a description of the general intention for the program, a breakdown of modules and learning outcomes, perhaps a schedule with deadlines. But as its intended readership is made up of learners, it must contain only information directly relevant to their participation.
Of course, the clearer you are in writing your course outline, the less risks of making mistakes you run when preparing a course syllabus.
A course outline is also not a complete agenda, although it might form the basis for one. If you are already beyond the course outline stage and looking for some tips on how to create a fully fleshed-out training course plan, check out this guide!

What information should a course outline contain?
In this section we’ll go through a list of content you’d expect to find in a well-crafted course outline. Go through it as if it were a checklist and verify that you’ve included all of this information in your outline. Is there something missing? Let us know in the comments or join the conversation in our friendly community!
Concept note
A concept note is a two- or three-line brief course description. Like an elevator pitch, it should make it immediately clear what the context is, what the main course topic is, who the course is for. A concept note will be mostly factual, with a couple of well-chosen adjectives indicating the direction or style of the learning programme.
The adjective “experiential” shows up heavily in my concept notes, as do the words “active”, “participatory” and “workshop”. This helps set expectations, especially for the client, and might open a conversation as to what the course topic may imply.
Here is an example from a course I recently designed:
A two-day experiential learning workshop for students in the International College on the topic of Information Ecology. Participants will join lectures held by experts in the field, and then work in teams to solve present-day challenges.
As you can tell, this description gives a quick, sound-bite overview of the general idea. I could have stopped at the first sentence, but the second one begins to flesh out the story, helping clients and collaborators visualize a scenario and understand what will be needed (e.g. “I see, so you’ll need a location where students can work in teams?”)
Learning objectives
Before writing a concept note and course outline, learning designers typically run some form of Training Needs Assessment (TNA). We take a good look at how that process works in this article.
One of the main outputs of a Training Needs Assessment is a list of learning objectives. These are the aims you are designing towards, the things participants should know how to explain, or do, after going through the program.
Well-designed courses are anchored by learning objectives: activities and content should all be chosen and assembled in a flow that will help learners achieve them.
As you can see in this course outline template example, I recommend you write the learning objectives in a note high up on top of the course outline. I’ve also chosen different colors to correspond to the different learning outcomes, and color-coded activities appropriately. This allows me to quickly visualize which learning activities are related to certain learning objectives and how the flow of the entire course works.

High-level schedule
The expectation with a course outline is not to have a fully defined agenda and timeline, nor to have learning material ready yet. While a fully developed agenda will include precise timings and instructions, a high-level schedule is just intended to show the general flow of the course.
Creating such a schedule will typically imply that you break down the course into modules, then add examples of how each module will be divided into, such as lectures, activities and quizzes. You may want to include ideas for possible activities, but it’s not worth including much detail at this stage, as things might change.
For example, it fits the scope of a concept note to write “Case Study” or “Role Play” and perhaps a line or two of explanation of why it’s a good idea to include this kind of activity at a certain stage. It’s beyond the scope of a course outline to go into details of what the role play will be, or to add instructions and materials: all that comes later.
Course timeline
A course outline can also include a timeline of the proposed course. How long will it last? What will milestones be, such as assignments and assessments? You might not know the exact dates to include yet at this stage, but it’s still a good idea to give a sense of the timeline and duration. This can help a lot with project management as you continue to develop your course.
Who is a training course outline for?
In your course creation process, you should keep in mind three possible types of audience. If you are creating a workshop or course you’ve ideated and will deliver yourself, then it can be a personal document you’ll use to structure your thinking and keep track of your own progress.
A more common scenario is for you to be collaborating with a team in some form. This may mean you are writing a course outline that other trainers will deliver, for example, or that you’ll pass on to developers to create online. In this case you are writing for yourself and your team.
Last but not least, and probably the most common scenario of all, you are creating a course outline as a proposal for a client. This might be an external organization you are working with as supplier, or a department or team inside your own organization. We’ll see below how to use a course outline to keep your clients updated on progress and get buy-in on your plans.
Creating a course outline for yourself
Creating a course outline for yourself means you can use any format you prefer, including jotted-down notes on a napkin. As your practice develops, you’ll find that having all your outlines organized can be extremely helpful to speeding up work in the future.
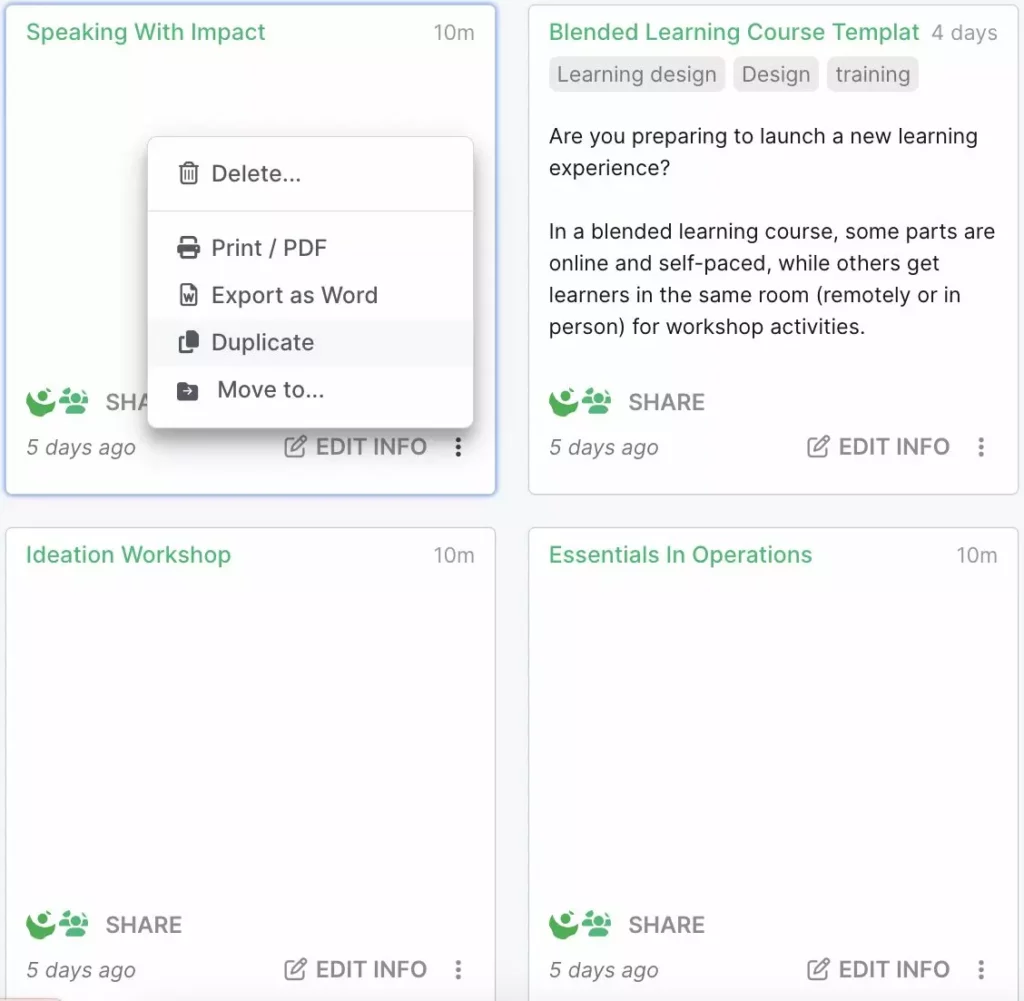
In SessionLab, you can save all your outlines, create tags for them and organize them, for example by client. This ensures that next time you need to create something new, you can base it on an existing document, learning from the past and getting repetitive work out of the way.
Creating a course outline for your team
When creating a course outline to share with your team, you’ll probably want to include some information on roles, tasks and responsibilities. Team members, such as other designers, trainers, content providers, will need to get a clear understanding of the project and also of their role in it.
At this stage, a full-blown script is not required yet, but if you want to get some feedback from the team, knowing who’ll be expected to do what will be quite useful. To achieve this in SessionLab, you can use tags and color coding to specify which parts of the course will, for example, be delivered as live training. You can also assign blocks of your session to specific collaborators, so they can tell at a glance what they will be responsible for executing.

How to create a course outline for a client
Creating an outline for yourself is useful to structure your thinking and organize your work. Having one to share with colleagues is essential to promote collaboration. But arguably the most important use of a course outline is to have something to share with the people commissioning a training program in the first place.
Getting buy-in from clients can often be the trickiest part of a trainer’s work. What appeared clear and evident in your mind is often not clear to clients, and it takes some time to land on language that you all share and understand in the same way!
When creating a course outline for a client, clarity, legibility and simplicity need to be on top of your mind. Think of this as an elevator pitch: how can you write and organize information in a way that is immediately comprehensible? Use the client’s own language, reflect it back to them, and explain jargon in clear terms.
For example, I might write “We’ll be using Kolb’s learning cycle in each module” to discuss an outline with colleagues, as I assume they know what I am referring to. The same thing would not be appropriate for an outline I intend to share with clients.
In that case, I’ll either translate the framework in layman’s terms directly (“We’ll be starting with practical experiences, then reflecting on them and adding some theory”) or refer to the framework while also expanding on it (“We’ll be using Kolb’s learning cycle, a powerful experiential learning tool that prescribes starting from experience before introducing theoretical concepts…”)
Having customizable printouts is really a winner when it comes to walking clients through an outline. In the past, I used to schedule lengthy meetings just to explain my messy Excel sheets to clients: now I use SessionLab to share simple versions of my outlines as PDF or Word printouts, or share a link through which they can easily visualize the flow.
Sometimes, for longer courses, I’ll record a video (I like to use Loom) of myself going through the course outline, send it to clients, then have a shorter meeting just to discuss feedback. A much better use of everyone’s time!
How to create an online course outline
Let’s say you are designing learning to be delivered not in person in a classroom, but online in a remote learning environment. Does your course outline change?
Essentially, the answer is no. You’ll still need to include the same information, and show a general structure and narrative. If you plan to create an online course, you’ll also need to include notes in your outline about what tech stack you expect to use. Depending on your agreements, you might also need to note whether you, the provider, have your own license for these, or whether you expect the client to use their own license and links.
If you are introducing participants to tools they may not be familiar with, include a module with simple tasks and games they can run through to get used to the technology.
If I’ll be using Miro or Mural boards, for example, I’ll generally create a practice board. Participants can access it before the course, finding spaces in which they are asked to add a picture, a gif, some personal information, perhaps a pin on a map. This enables to exchange information about who will be joining, and doubles as practice for participants who may not be familiar with the tech tools yet.
5 narratives I base my course outlines on
In dynamic training and group facilitation, we talk a lot about activities, methods and techniques. At SessionLab, we have a library of over 1000 of those! Despite our passion for exchanging tips and practices about icebreakers, energizers and team games, though, facilitators are well aware that you should never start designing from activities.
When beginning a new session or course design, the first thing to do instead is to figure out the overall narrative. Think about it as a journey you will take participants on.
There are many different ways of conceptualizing such high-level designs. You might want to use a science-based approach from Learning Design Models, or prefer to be guided by storytelling, and base your design on a narrative arch such as the Hero’s Journey (as in this great example). This depends on your knowledge, style and, of course, on the type of course you are designing.
In my practice, I mostly work with higher education institutions (HEIs), designing and delivering programs for young adults, often in connection with environmental or social change. I also support nature management authorities, such as national parks, in designing and holding multi-stakeholder spaces for dialogue. In these capacities, here are the five models I most often rely on to create a course outline.
Using an established model to scaffold your course outline is, in my experience, very helpful in explaining your thinking to clients. Narratives are powerful tools. They will help you clarify why you are following certain steps. Rather than choosing individual activities, you’ll be following a story, a journey, a tale of transformation and change.
What? So what? Now what?
When designing short interventions, I often rely on the effective and simple three-step reflective model. What? So What? Now What? Terry Borton, an American educator, codified this method in the 1970s in his influential book Reach, Touch and Teach.
The model indicates a progression from “What” (introducing content, describing what happened) to an analysis and reflection stage (Now What). Armed with new knowledge, learners should then be encouraged to make plans for the future (Now What).
In this course outline template you can see how I’ve used the What? So What? Now What? model to structure a course in three parts.
Kolb’s Learning Cycle
Kolb’s Learning Cycle is the essential learning model for experiential training. Designed by American educational theorist David Kolb in the 1980s, it follows four steps:
- Concrete experience, with room for practical, experiential activities;
- Reflective observation, a time to debrief, form opinions on what the exercise revealed, and discuss them with others;
- Abstract conceptualization, when it’s up to the trainer to offer models, theories and frameworks conducive to deeper understanding and, lastly
- Active experimentation, in which participants are guided to begin applying new learnings to real-world situations.
Often applied intuitively by trainers who favor experiential, interactive learning, it can be used as the template for each learning module in your course. Find an example of how Kolb’s Learning Cycle can be used to design a high-level outline for a training workshop in this template.

The Work that Reconnects spiral
I often teach courses that are connected to sustainability, biodiversity and climate topics. A powerful tool for working with the emotional landscape that comes with facing difficult truths about the state of our planet is Joanna Macy’s Work that Reconnects spiral. You can find it explained in a particularly accessible form in the book she co-wrote with psychologist Chris Johnstone, Active Hope.
Once more, we find a narrative arch that supports moving from awareness and reflection into action. The idea is to reconnect to self, to each other, and to what is going on in the world, in order to find purpose and energy to act.
The four steps of the Work that Reconnects are:
- Starting with Gratitude. This is about activities that create listening and connection with one another, and grounding oneself in positive emotions before
- Honoring the Pain. Expressing and sharing what are often labeled as “uncomfortable” emotions is a way to reconnect with our common humanity.
- Seeing with New Eyes. This is about taking a different perspective on the issues at hand, be it through systems thinking, a longer view of the timeline, or using empathy training to imagine different points of view and open possibilities.
- Going Forth. The last part of the spiral is about action planning, accountability, and defining how to take the next step forward.
Developed initially as a tool for activists working on nuclear disarmament, this framework is particularly suited to courses and training workshops that deal with emotionally challenging material, be it social or environmental in nature. Like the other models, it creates a solid foundation guiding choices of what activities to include.
Tuckman’s stages of team development
Another way of looking at the journey trainers take participants through in a training course or program is by focusing on the changes within the group dynamics. Tuckman’s well-known model describes five stages teams go through, from Forming to Adjourning (aka Mourning). If you are not familiar with this model yet, you can read about it here.
Tuckman’s stages of team development, simply explained, describe what happens in a group as it goes through the ups and downs of meeting (Forming), organizing (Norming), encountering differences and obstacles (Storming), getting the work done (Performing), and parting ways (Adjourning). For each step, you can think of what the group needs, how members are likely to feel, and what activities and questions would support going through that phase swiftly and productively.

When designing programs that are based on peer learning and groupwork, I look no further than Tuckman’s stages to structure my course outline. This enables me to clearly articulate to clients the need for an opening session focussing on knowing one another and forming the group. It also reminds my own self to keep a module at the end for assessment and self-reflection, to collect learnings and say good-bye.
I’ll use this model as a foundation for a course outline when I am hired to design the interaction engagement part of a program in which other experts will provide content, or when planning challenge-based learning programs such as hackathons.
Prochaska and DiClemente’s stages of change model
When training as a trainer for bottom-up citizen action, I learned about Prochaska and DiClemente’s stages of change model (very well explained in this blog page from Social Work Tech). Originally emerging from studies of addiction, relapse and recovery, this framework serves to better understand patterns of change. How, and why, do people change habits, even when it’s hard? What helps sustain changes through time?
I like to think of every learning program as a program of change, designed to change something in the way a person acts in the world. A narrative model that takes us from “same old”, to “why should I change?” to “how can I change” to “what will help me sustain this change in time” can be ideal, in certain cases.

I’ve recently used Prochaska and DiClemente’s stages of change model, for example, as a basis for a course outline designed to help residents of small mountainous areas better understand and deal with the presence of wildlife. My course outline had five modules, one for each stage of change. At the first stage, Pre-contemplation, people do not know yet that there is an issue or problem. It is therefore logical to provide information and data in lectures, videos and presentations.
At the second, Contemplation, the main question is “what is going on?” so we invited local experts to share their stories. For the third, preparation, it is key to understand what can be done, which I enabled through site visits to model locations, such as well-fenced farms. Next comes Action, covered by a series of hands-on training sessions. Finally, for Maintenance, I designed a celebration-slash-conference where participants shared their stories of experimenting with new ways of doing things, and discussed what could be done to keep up the good work after the end of the project. I hope they don’t relapse!
Sharing your course outline
If your outline is needed to get approval from your client or stakeholders, you’ll likely want to use a simple but legible format that makes it easy to demonstrate your vision to others. This can be as simple as a Google document with a bullet point list, project intro or brief and a short explanation of how you’ll be achieving the desired learning outcomes.
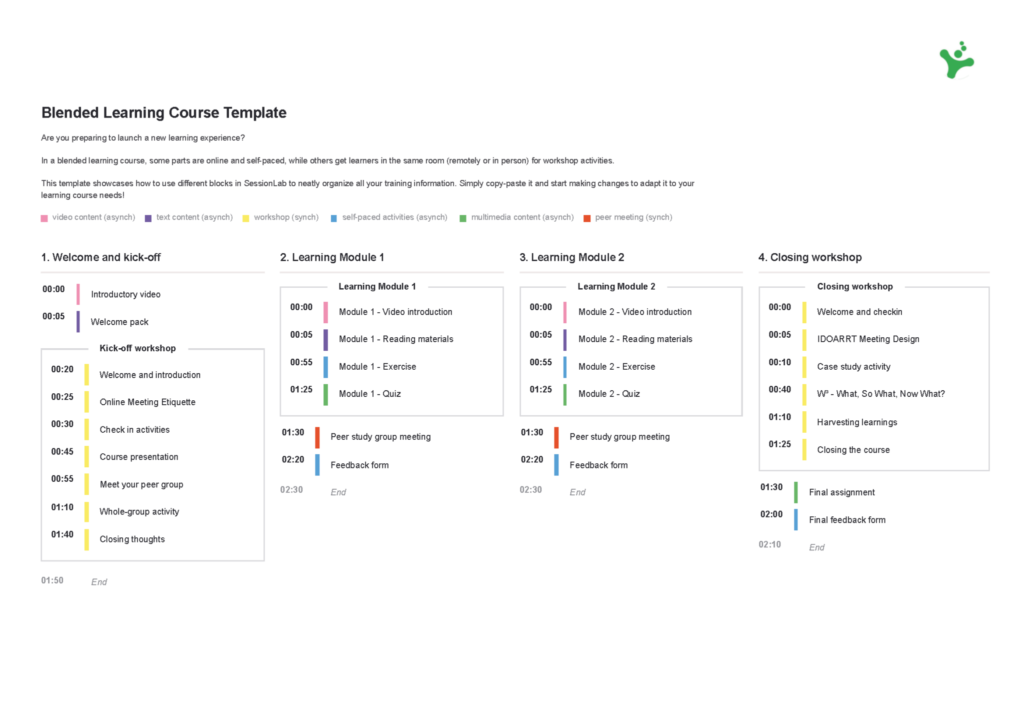
For me, I’ll export a simple PDF of my SessionLab outline with color-coding as a PDF to share with stakeholders. The color-coding can really help tell the story of the course and make it easy for them to parse.

Exporting a simple view of the course structure as a PDF is a fast way to tell the story of your storyboard before diving into specifics. Note the use of color-coding to show the activity type of each block in the outline.
I’ll then duplicate my SessionLab course outline and begin turning that into a storyboard or training program agenda, while keeping a copy of the original. This helps me save time in the future, while also ensuring I have a record of my design process.
You might also have your own template that you use for all your courses and simply fill in with your newest project. In this case, you can turn your best outline formats into a SessionLab template so you can reuse it as many times as needed.
What next
Once you have approval on your course outline, one of your next steps will be adding learning activities and turning your outline into a completed agenda. These can make the difference between a course that is run and forgotten and a memorable, impactful learning experience. If you are looking for some ideas of activities to add to improve student engagement, read on for 24 ideas of engaging training games and activities.
If you found the section on narrative and frameworks interesting and would like to learn more about this, we’ve got you covered with resources on instructional design models and on Gagne’s 9 events of instruction.
If you are ready to start designing, try out our ready-made templates to kick-start your work. This Essential Training Agenda is based on Kolb’s learning cycle and perfect for participatory training.
If you are designing online courses, you might also be interested in checking out materials related to storyboarding. Start with this collection of storyboarding templates, and let us know how it goes!


Leave a Comment